Battery switch on travel trailer function is crucial for managing your RV’s power. This guide dives into the hows and whys of these switches, covering different types, installation, troubleshooting, and maintenance. Whether you’re a seasoned RVer or a newbie, understanding your battery switch is key to a smooth and enjoyable camping experience.
We’ll walk you through connecting and disconnecting batteries safely, testing voltage, and even tackling common problems. You’ll learn how the battery switch affects your appliances and overall energy management, empowering you to keep your travel trailer running efficiently. Get ready to become a battery switch pro!
Connecting and Disconnecting Batteries
Properly connecting and disconnecting your travel trailer’s batteries is crucial for safe and reliable operation. This involves understanding your battery switch, following safety procedures, and knowing how to test your battery system. Ignoring these steps could lead to damage to your batteries, electrical system, or even personal injury.
Connecting and disconnecting your house and chassis batteries using a battery switch is relatively straightforward, but requires careful attention to detail. Most switches have positions for both batteries, a combined position, and an “off” position. The specific operation will depend on your switch’s labeling, so always refer to your switch’s instructions. Remember, always disconnect negative terminals first when working with batteries.
So, you’re prepping for your next adventure in your travel trailer? First things first: understanding your power. Check out this guide on the battery switch on travel trailer function to avoid any dead-battery surprises. Once you’ve got the power sorted, it’s time to focus on the entertainment! Setting up an amazing audiophile travel setup will make those long drives and nights under the stars even better.
Make sure to check both links before you go!
Battery Connection and Disconnection Procedure, Battery switch on travel trailer function
Before beginning any work on your battery system, always disconnect the negative (-) terminal of both your house and chassis batteries. This prevents accidental short circuits. Then, follow these steps to connect or disconnect the batteries depending on the position of your battery switch. Consult your battery switch’s instructions for precise details. Common switches use a system of levers or rotary selectors to manage battery power flow.
Safety Precautions When Working with Batteries and Electrical Systems
Working with batteries and electrical systems carries inherent risks. Always wear appropriate safety glasses to protect your eyes from sparks or acid splashes. Battery acid is corrosive, so wear gloves and old clothes to prevent damage to your skin and clothing. Ensure the area is well-ventilated to prevent the buildup of explosive hydrogen gas, a byproduct of battery operation.
Never smoke or use open flames near batteries. If you’re unsure about any step, consult a qualified technician.
Using a Multimeter to Test Battery Voltage and Connections
A multimeter is an invaluable tool for testing battery voltage and ensuring proper connections. To test battery voltage, set your multimeter to DC voltage (usually represented by a “V” with a dashed line next to it). Place the red lead on the positive (+) terminal and the black lead on the negative (-) terminal of the battery. The reading displayed should correspond to the battery’s rated voltage (typically 12V for lead-acid batteries).
A significantly lower reading indicates a weak or faulty battery. To check connections, ensure the multimeter is set to measure continuity (usually represented by a symbol that looks like a diode). A low resistance reading indicates a good connection; a high resistance reading suggests a loose or corroded connection.
Safely Switching Between Battery Banks in a Dual-Battery Setup
Switching between battery banks in a dual-battery setup allows you to prioritize power usage. For example, you might run your house appliances off one bank and save the other for starting your vehicle. Before switching, ensure all appliances drawing power from the bank you’re disconnecting are turned off. Then, use the battery switch to select the desired battery bank.
Always verify the switch’s position before connecting any loads to ensure you are drawing power from the intended bank. Regularly inspect your battery connections for corrosion and clean them as needed to maintain optimal performance.
So, you’re prepping for your next adventure in your travel trailer? First things first: understanding your power! Check out this guide on the battery switch on travel trailer function to avoid any unexpected dead-battery situations. Once you’ve got the power sorted, it’s time to think about entertainment. For the audiophile on the go, setting up a killer sound system is key.
A great resource for that is this article on audiophile travel aetup , helping you create the perfect mobile listening experience. Happy travels!
Battery Switch and its Impact on Travel Trailer Systems: Battery Switch On Travel Trailer Function
The battery switch is the central control point for your travel trailer’s power, dictating which battery bank (or neither) powers your appliances. Understanding its function is crucial for efficient energy management and preventing unexpected power outages. A proper understanding of how the switch operates will help you extend the life of your batteries and avoid draining them unexpectedly.
The battery switch directly affects how your appliances run. Flipping the switch to “Battery 1” will power your systems from your main house battery, while “Battery 2” typically provides power for auxiliary functions or a second battery bank for solar charging. The “Off” position isolates both batteries, preventing accidental discharge. The “Both” position (if available) connects both banks, useful for charging one from the other or providing more power for high-demand situations.
Appliance Operation and Battery Bank Selection
Different appliances consume varying amounts of power. Lights, for example, are relatively low-draw items, easily handled by either battery bank. However, the water pump, which requires significantly more power, will run more efficiently and longer from a larger, fully charged battery bank. Similarly, a refrigerator running on 12V (depending on the model) will drain a smaller battery faster than a larger one.
Consider the power demands of each appliance and choose your battery bank accordingly. A larger battery bank will generally power high-draw appliances longer before requiring recharging.
Energy Consumption Comparison Between Battery Banks
Let’s illustrate with an example. Assume Battery 1 is a 100Ah deep-cycle battery, and Battery 2 is a 50Ah deep-cycle battery. Running a 10-amp water pump for one hour will drain approximately 10Ah. Battery 1 could power this pump for approximately 10 hours (100Ah / 10Ah/hour), while Battery 2 could only power it for about 5 hours (50Ah / 10Ah/hour).
This demonstrates how battery capacity directly influences the runtime of your appliances.
Battery Switch and Overall Energy Management
The battery switch is a cornerstone of energy management in your travel trailer. By selectively powering systems from different banks, you can prioritize essential appliances during periods of limited power. For instance, you might choose to run only the refrigerator and lights from Battery 1 while conserving Battery 2 for emergency use or for powering appliances that are not critical.
This strategic use of the switch helps to maximize the lifespan of your batteries and prevents unexpected power failures.
Comparison of Battery Switch Types
| Switch Type | Features | Benefits | Drawbacks |
|---|---|---|---|
| Simple Two-Position Switch | Basic on/off for each battery bank; often includes an “off” position. | Simple, inexpensive, reliable. | Limited functionality; no combined power. |
| Three-Position Switch (with “Both” position) | Adds a “both” position, allowing combined power from both batteries. | Increased power capacity; useful for high-demand situations. | Slightly more complex; potential for increased drain if not managed carefully. |
| Automatic Battery Switch | Automatically switches between batteries based on voltage levels or other criteria. | Automated management; prevents deep discharge. | More expensive; requires proper setup and maintenance. |
| Smart Battery Switch | Advanced features, often including monitoring and control via an app. | Comprehensive monitoring and control; integration with other systems. | Highest cost; complexity may require specialized knowledge. |
Illustrations

Understanding how a battery switch works is crucial for safe and efficient use of your travel trailer’s electrical system. Visual aids significantly improve this understanding. The following diagrams will help clarify the internal workings of a battery switch and its connection to your trailer’s batteries.Visual representations of different battery switch types and their functionality will also be provided.
This will aid in choosing the right switch for your specific needs.
Internal Components of a Typical Battery Switch
This diagram depicts a typical battery switch, often a multi-position switch. Imagine a rectangular box with several terminals on the side and a lever or rotary dial on the top. Internally, there are several heavy-duty contacts that are mechanically switched based on the position of the lever or dial. These contacts are arranged to connect or disconnect the batteries from each other and from the trailer’s electrical system.
A common configuration shows terminals for each battery (typically a house battery and a chassis battery), a terminal for the load (the trailer’s electrical system), and a terminal for a possible ground connection. The lever or dial selects which connections are made, allowing for various combinations like both batteries feeding the load, only one battery feeding the load, or both batteries isolated from the load.
Internal components include robust copper contacts, insulated terminals, and a strong mechanical mechanism to ensure reliable switching. The switch casing is typically made of heavy-duty plastic to protect the internal components from damage and moisture.
A well-labeled diagram would show the terminals clearly marked as “Battery 1,” “Battery 2,” “Load,” and “Ground,” and the lever positions clearly indicating the state of each connection (e.g., “Both Batteries On,” “Battery 1 Only,” “Battery 2 Only,” “Off”).
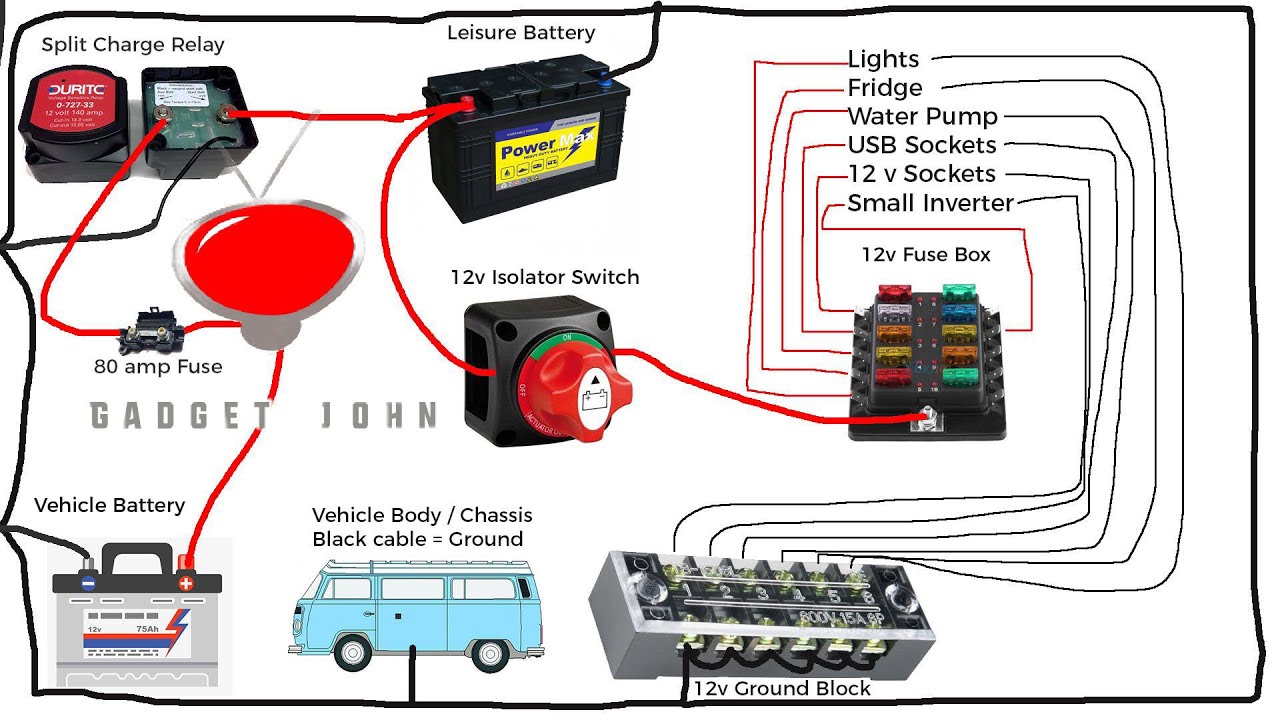
Wiring Diagram: Battery Switch, House Battery, and Chassis Battery
This diagram would show two batteries, clearly labeled “House Battery” and “Chassis Battery,” each with positive (+) and negative (-) terminals. These terminals would be connected to a battery switch via appropriately sized wires. The battery switch would have terminals corresponding to each battery and a “Load” terminal representing the trailer’s electrical system. The positive terminal of each battery would connect to a separate input terminal on the switch.
The “Load” terminal on the switch would be connected to the positive input of the trailer’s electrical system. The negative terminals of both batteries would be connected together and then to a common ground point, also connected to the chassis of the trailer. The diagram would also indicate the use of appropriate fuses or circuit breakers in the positive lines to protect the system from overcurrent.
The wiring diagram would clearly show the path of the positive current from the batteries through the switch to the load, and the path of the negative current completing the circuit. It would highlight the importance of using appropriately sized wires to handle the current draw and the inclusion of fuses for safety.
Types of Battery Switches and Their Functions
This illustration would showcase three common types: a simple two-position switch (on/off), a three-position switch (both batteries, battery 1, battery 2, off), and a more sophisticated switch with additional features like a combined start/run configuration or a remote control option. Each switch would be depicted with its own simple diagram showing the input and output terminals and the switch positions.
A short description below each diagram would highlight its key features and typical applications. For instance, the simple two-position switch would be described as suitable for basic systems, the three-position switch for more complex systems needing selective battery use, and the advanced switch as a solution for larger RVs or trailers with increased power demands and the need for remote monitoring.
The visual would make it clear that different battery switches offer different levels of control and functionality, tailoring to various needs and complexities of the travel trailer’s electrical system. The descriptions should emphasize the suitability of each switch type for different applications.
Mastering your travel trailer’s battery switch is all about safety, efficiency, and peace of mind. By understanding its function, performing regular maintenance, and knowing how to troubleshoot issues, you’ll ensure your RV’s power system is always ready for adventure. So, go forth and power your next camping trip with confidence!
General Inquiries
What happens if my battery switch is faulty?
A faulty switch can lead to no power to certain systems, incorrect switching between batteries, or even damage to your batteries. Troubleshooting is key – check connections, test the switch itself, and consider professional help if needed.
How often should I test my RV batteries?
Aim to test your batteries monthly, especially before longer trips. Use a multimeter to check voltage and ensure they’re holding a charge adequately. Regular testing helps catch potential problems early.
Can I use any type of battery switch in my travel trailer?
No, the type of switch depends on your setup (single or dual battery). Choosing the wrong one could lead to incorrect wiring and potential damage. Always consult your RV’s manual or a qualified electrician for guidance.
How do I clean my battery terminals?
Disconnect the batteries first! Then, use a wire brush or terminal cleaner to remove corrosion. Apply a corrosion inhibitor to prevent future build-up. Clean connections ensure efficient power flow.
